
How to Use an Angled Eyeliner Brush for Professional Precision in 2026
Precision isn't a result of a steady hand; it's a result of brush ergonomics. The angle of the bristles must dictate the direction of the stroke, not the movement of your wrist. Many users struggle with jagged lines or asymmetrical wings because they fight against their tools. Using a high-quality angled eyeliner brush correctly removes the guesswork from application. It's about utilizing the physical properties of the tool to create professional results.
You've likely dealt with jagged lines, asymmetrical wings, and splaying bristles. These technical failures make professional results feel impossible. This guide changes that. You'll learn the 'stamp and drag' technique for sharp, crisp lines. We'll cover specific brush shapes, tightlining methods, and professional application standards for 2026. This is your blueprint for achieving technical precision with ease. You'll gain a functional understanding of how synthetic fibers and weighted handles contribute to a steady, controlled application. We'll focus on the tangible steps needed to master your kit and eliminate application errors.
Key Takeaways
- Utilize firm synthetic bristles to maintain a sharp edge under pressure and ensure consistent line thickness without splaying.
- Identify the technical performance differences between a standard angled eyeliner brush and an ultra-thin blade brush for specialized "invisible" liner looks.
- Master the 'stamp and drag' technique by flattening bristles before application to achieve symmetric, professional-grade wings.
- Optimize application by matching brush density to formula, using firm synthetic heads for gels and thinner profiles for liquid products.
- Extend tool lifespan and maintain precision by reshaping bristles while damp and cleaning immediately after using waterproof formulas.
Understanding the Angled Eyeliner Brush Anatomy
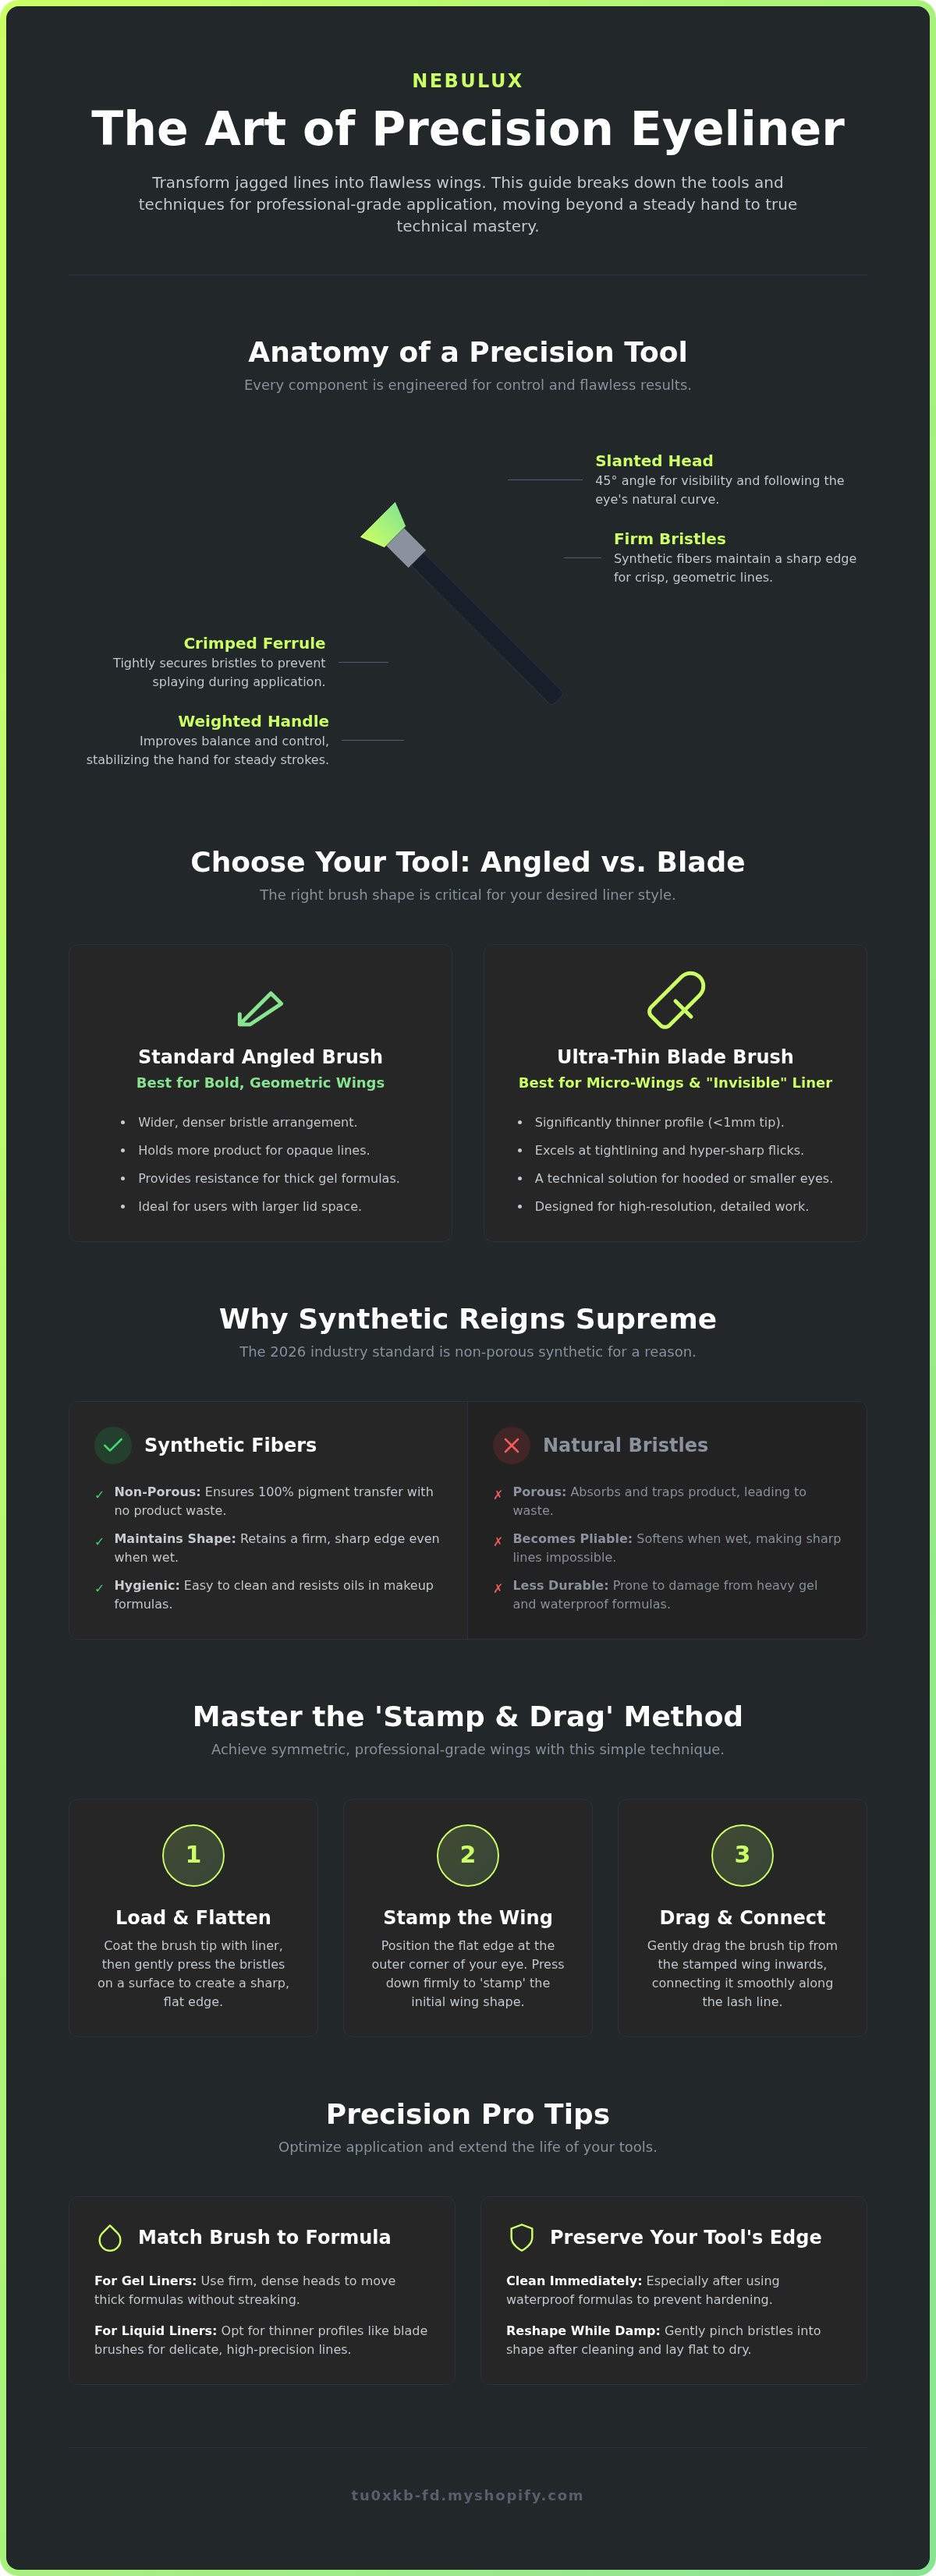
An angled eyeliner brush relies on a specific slanted head geometry. This design mimics the natural curvature of the human eye. It allows for a single, continuous stroke along the lash line. High-performance models utilize firm, synthetic bristles to maintain a sharp edge under pressure. This rigidity is necessary. Without it, the brush head collapses, resulting in thickened, blurry lines. Professional-grade tools, such as the Blade eyeliner brush, represent the evolution of this design, offering an even slimmer profile for ultra-thin precision.
- Slanted Head: Engineered to follow the eye's natural arc for smooth transitions.
- Firm Bristles: Provides the resistance needed for sharp, geometric edges.
- Crimped Ferrule: Secures bristles tightly to prevent splaying or shedding during gel application.
- Weighted Handle: Improves balance and control while stabilizing the hand against the cheek.
Construction quality centers on the ferrule. A tightly crimped, double-threaded ferrule prevents bristle splaying during heavy gel application. This ensures the brush tip remains a single, cohesive unit even after multiple uses. The handle design is equally functional. Ergonomic, weighted handles facilitate a "pencil grip" technique. This allows the user to anchor their hand against the cheekbone; this stability reduces the impact of micro-tremors and ensures a straight, predictable path for the product.
Synthetic vs. Natural Bristles for Precision
Synthetic fibers are non-porous. They don't absorb liquid or cream products. This ensures 100% pigment transfer from the brush to the skin. Natural bristles, often made from animal hair, feature a porous cuticle. These fibers soak up product and soften when wet. This makes them too pliable for the rigid, geometric lines required for winged looks. Synthetic fibers are the industry standard for gel liners in 2026 because they maintain structural integrity and hygiene while resisting the heavy oils found in high-pigment formulas.
The Role of the Slant Angle
The 45-degree slant angle is a visibility feature. It allows the user to see past their own hand while applying product. This direct line of sight is critical for symmetry. The slant also provides a flat "stamping" surface. By pressing the side of the bristles against the lash line, you create a consistent thickness without needing to draw a line. Directional control depends on identifying the "high point" and "low point" of the brush head. The high point, the longest bristles, leads the stroke for sharp tails. The low point follows to fill the base. This orientation dictates the sharpness of the final wing.
Angled vs. Blade Eyeliner Brushes: Which is Best?
The standard angled eyeliner brush is a multi-functional tool. It features a wider, denser bristle arrangement. This increased surface area allows the head to hold a larger volume of product. It is the primary choice for creating bold, thick wings. The density provides the necessary resistance to move thick gel formulas across the lid without losing saturation. It creates a solid, opaque line in a single pass. This makes it ideal for high-impact, geometric styles.
In contrast, the blade eyeliner brush represents a specialized advancement in tool design. It is significantly thinner. The profile is narrow, often measuring less than 1mm at the tip. This allows for "invisible" liner looks where the product is placed directly into the lash base rather than on top of it. Blade brushes excel at tightlining. They create the sharpest possible flick at the outer corner. The thinness ensures the wing remains a fine point rather than a blunt edge.
Efficiency in makeup application requires the correct tool for the eye shape. A standard angled eyeliner brush provides a stable base for those with large lid real estate. However, the blade brush solves the common issue of liner "disappearing" or smudging on hooded eyes. It places pigment precisely where the lid meets the lashes. This minimizes the risk of the product transferring to the upper lid fold during the day. It is a technical solution for complex eye structures.
When to Reach for a Blade Eyeliner Brush
Choose the blade profile for ultra-precise graphic liner or micro-wings. It is the most effective tool for users with limited lid space. The slim design prevents the liner from dominating the eye area. For a detailed breakdown of dimensions and bristle density, view the blade eyeliner brush technical guide. It is designed for high-resolution work that standard brushes cannot replicate. It ensures the sharpest possible finish for professional kits.
The Versatility of the Standard Angled Shape
The standard angled shape offers utility beyond the lash line. It doubles as a brow filler when used with powder or pomade formulas. The wider base provides a stable footprint. Beginners often find this easier to control. It resists shaking better than a thin blade. This shape is also superior for smudging pencil liner. It blends product into a smoked-out wing with minimal effort. It is a reliable, all-purpose tool for a daily kit.
Selecting the right tool depends on the desired outcome. For high-impact styles, the standard angle is reliable. For high-precision work, the blade is mandatory. If you need a tool that handles both gel and liquid with professional efficiency, consider upgrading to a Blade eyeliner brush for maximum control.
Step-by-Step: The 'Stamp and Drag' Application Method
Effective application begins before the brush touches the skin. Load your angled eyeliner brush with a small amount of gel or liquid product. Immediately "flatten" the bristles by pressing them between your fingertips or against a mixing palette. This step is mandatory. It compresses the synthetic fibers into a razor-sharp edge, ensuring the tool maintains its geometric profile during the stroke. Without this preparation, bristles may splay, leading to thickened or jagged lines.
The "Stamp" is the foundation of a precise wing. Position the high point of the brush head at the extreme outer corner of the eye. The high point, which consists of the longest bristles, should point toward the tail of your eyebrow. Press the brush firmly against the skin to deposit a crisp, triangular starting point. This initial stamp determines the thickness of the outer wing without requiring any lateral movement.
Adjust the handle angle to determine the "Tilt." A higher handle position creates a more vertical, lifted wing. A lower handle results in a flatter, elongated flick. Once the angle is set, begin the "Drag." Use light pressure to pull the remaining product inward toward the pupil. This movement should be a single, controlled stroke that tapers as it moves toward the inner corner of the eye. The goal is a seamless connection between the outer wing and the lash line.
Mastering the Outer Wing Flick
Symmetry is the primary challenge in winged liner. Use your lower lash line as a geometric guide. The angle of the wing should act as an extension of that lower curve. Utilize the "ghost stroke" technique. Practice the dragging movement 1mm above the skin before making contact. This builds muscle memory for the specific hand path required. Ensure symmetry by alternating eyes at each step. Stamp the left eye, then the right. Drag the left eye, then the right. This prevents one side from becoming more exaggerated than the other.
Tightlining for Lash Volume
Tightlining involves placing pigment directly into the lash roots. Use the flat side of the angled eyeliner brush for this technique. Instead of drawing a line, press the pigment into the gaps between individual lashes. This creates the illusion of a thicker lash base without a visible line on the lid. The angled shape is significantly safer for the waterline than pointed brushes. The flat edge provides a stable contact point that prevents accidental poking of the eyeball. For additional safety tips and tool recommendations, refer to the best eyeliner brush for beginners guide. It outlines the specific safety protocols for working near the ocular surface.
Optimizing Your Brush for Different Liner Formulas
Formula choice determines the technical requirements of your tool. An angled eyeliner brush must match the viscosity of the medium to prevent dragging or skipping. Gel liners require high-density synthetic bristles. These fibers offer the resistance needed to carve out a sharp wing through thick, oil-based pigments. Liquid liners behave differently. They require a non-absorbent blade brush profile to maintain a thin line without the product bleeding into the skin's texture. Choosing the wrong density leads to poor pigment distribution and messy edges.
Powder and eyeshadow formulas require a softer approach. These need a slightly more flexible angled eyeliner brush to pick up dry pigment effectively. A brush that's too rigid will simply kick up dust rather than depositing a concentrated line. Cream formulas benefit from the wider surface area of a standard angled brush. This width allows for simultaneous application and blending. It's the most efficient way to create "lived-in" or smoked-out looks without switching tools mid-application.
The Gel Liner Precision Framework
Working out of the cap is a standard professional practice. It prevents the brush from becoming overloaded with excess product. Dip only the tip of the bristles into the cap where the product layer is thinner. Clean your bristles every 3 to 5 minutes during a complex application. Gel formulas dry rapidly; this buildup creates "crusting" that leads to jagged edges and uneven thickness. The viscosity of the gel dictates the required bristle stiffness; thicker gels require more rigid fibers to ensure the tool doesn't bend mid-stroke.
Using Eyeshadow as a Soft Eyeliner
Use the "wet-to-dry" method for increased pigment payoff. Dampen your brush with a setting spray before dipping into the powder. This turns the shadow into a temporary paste for a more defined, long-wear line. "Stamp" the powder along the lash line rather than drawing a continuous stroke. This technique yields a natural, diffused look that's more forgiving than liquid formulas. For a complete list of hardware needed for these techniques, consult our reference guide on eye makeup tools. It covers the technical specifications for various professional-grade applicators.
If you're looking for a tool that handles both wet and dry formulas with professional-grade durability, shop the Blade eyeliner brush for your kit. It provides the stiffness required for gels and the precision needed for wet shadow application.
Maintenance: Preserving Your Tool's Precision Edge
Tool longevity depends on immediate post-application care. Gel and waterproof formulas contain fast-drying polymers that bond to synthetic fibers within minutes. If these residues are left on the angled eyeliner brush, they create a "crust" that forces bristles to separate. This splaying destroys the sharp geometric edge required for professional wings. Cleaning the brush immediately after every use is mandatory to prevent permanent fiber distortion. This practice ensures the tool remains a reliable instrument for high-precision work.
Reshaping the bristles while they are damp is the most critical technical step in maintenance. After rinsing, use your thumb and forefinger to pinch the bristles back into their original slanted profile. This action sets the "memory" of the synthetic fibers as they dry. If a brush dries in a splayed or bent position, it will likely retain that shape, making it impossible to achieve a crisp line during the next application. Consistency in reshaping preserves the tool's utility for months.
Storage and replacement cycles also dictate performance. Store your brushes vertically with the head facing up or lay them flat on a clean, dry surface. Never store a brush head-down in a container. This puts unnecessary pressure on the bristles and weakens the ferrule crimp. Recognize the signs of tool fatigue. If the bristles no longer return to a razor-sharp edge after reshaping, or if you notice consistent shedding, the brush has lost its edge. Professional users typically replace their primary angled eyeliner brush every 6 to 12 months to maintain peak application standards.
The Deep Clean Routine
Daily maintenance requires a dedicated brush cleanser to remove surface pigment. For heavy waterproof buildup, use a mild oil-based remover first to break down the chemical bond of the liner. Rinse thoroughly with lukewarm water. Always dry the brush at a slight downward angle. This prevents water from seeping into the ferrule and dissolving the adhesive that secures the bristle bundle. For a comprehensive walkthrough on sanitization and hardware longevity, view the guide on how to clean eyeliner brush effectively. Proper drying technique is as important as the cleaning agent itself.
Professional Kit Integration
Efficiency in a professional kit requires redundancy. Maintain at least two angled brushes: one dedicated to dark pigments and another for light or metallic shades. This prevents cross-contamination and reduces cleaning time during complex applications. For maximum symmetry, pair your brush work with the seal eyeliner pen for hybrid looks. Use the pen to establish the base wing and the brush to fine-tune the flick. Nebulux provides these high-utility, functional tools to ensure your kit remains organized and capable of professional results every time.
Master Your Professional Liner Application
Professional precision is a technical process involving tool selection, formula matching, and specific hand positioning. You've learned that a quality angled eyeliner brush is the foundation for symmetric wings and clean tightlining. By utilizing the "stamp and drag" method and maintaining your tools through immediate cleaning, you ensure consistent, high-definition results. These methods remove the frustration of unsteady hands and splaying bristles from your routine.
Ready to upgrade your makeup kit? Shop the Nebulux Blade Eyeliner Brush for professional precision. Our brushes feature ultra-thin synthetic bristles specifically designed for high-definition gel application. We offer reliable national shipping across the US to ensure you have the tools needed for a flawless finish. You have the knowledge; now get the equipment that matches your skill level.
Frequently Asked Questions
Is an angled eyeliner brush better than a pointed one?
An angled profile is superior for creating geometric shapes and winged tails. The slanted head mimics the eye's natural curve, allowing the tool to do the directional work for you. Pointed brushes require significantly more manual dexterity to control line thickness. For sharp, professional wings in 2026, the angled design remains the industry standard for stability and speed.
Can I use an angled eyeliner brush for my eyebrows?
Yes, standard angled brushes are highly versatile tools for brow application. The firm synthetic bristles effectively pick up and distribute brow pomades or powders. If you use the same tool for both, ensure thorough cleaning between applications. This prevents dark eyeliner pigments from muddying your brow color and maintains high hygiene standards for the eye area.
How do I stop my angled brush from splaying?
Flatten the bristles between your fingertips immediately after loading the product. This technical step compresses the fibers into a single, razor-sharp edge. Avoid pushing the brush head directly down into product jars. Instead, swipe the brush along the side of the container to keep the bristles aligned. Proper "stamping" pressure during application also prevents the head from spreading over time.
What is the best way to clean a gel-caked angled brush?
Use a mild oil-based remover to break down waterproof polymers followed by a dedicated brush cleanser. This two-step process is necessary for removing deep-seated gel residues that cause bristle "crusting." Rinse with lukewarm water and reshape the head while damp. This ensures the synthetic fibers dry in their original slanted orientation, preserving the tool's precision for the next use.
Why is my winged eyeliner always uneven with a brush?
Uneven wings usually result from inconsistent hand anchoring and lack of symmetry during the process. Rest your pinky or the side of your hand against your cheekbone to stabilize micro-tremors. Use the "stamp and drag" method and alternate eyes at each stage. Stamp the left eye, then the right; this prevents one side from becoming more exaggerated than the other as you work.
Do I need a different brush for liquid vs. gel eyeliner?
Specialized tools perform better for specific formulas. Gels require stiff synthetic bristles to move through the thick, viscous pigment without the brush head collapsing. Liquid formulas benefit from a thinner blade profile. This prevents the liquid from bleeding into the bristles and ensures the line remains thin. Using a dedicated angled eyeliner brush for each medium improves your technical results.
What is a blade eyeliner brush vs. a regular angled brush?
A blade brush is a significantly thinner and more compressed version of a standard angled tool. It features a narrower ferrule and fewer bristles to create a profile often less than 1mm thick. This design allows for "invisible" tightlining and ultra-fine flicks. Regular angled brushes are thicker, making them better for bold wings and brow filling where more product volume is required.
How often should I replace my eyeliner brushes?
Replace your precision brushes every 6 to 12 months depending on your application frequency. Look for signs of mechanical failure like permanent bristle splaying, shedding, or a loose ferrule. Once the bristles lose their ability to form a sharp edge, the tool is no longer functional for professional-grade work. Regular replacement ensures your wings remain crisp and your application remains hygienic.